
This is Project of the Week. This is one of our Project of the Week projects from Revolvis Security Services.
The client in Mineola, New York wanted total security. Not partial coverage. Every way in covered three ways: seen, sensed, and announced.
- Every door and gate has a camera watching it
- Every door and gate has a sensor that knows if it opens, even if the camera is blocked
- Front door and patio door both have a doorbell that lets them see and talk without opening the door
- No blind spot anywhere — front, sides, or back
- Works at night in full darkness at gates and backyard
- No false alerts from trees, cats, or passing cars
- One phone view with plain names
If one device fails, the other two on that same entry still protect it. That is total security.
Team: Lead Technician John J. — Design, measurements, programming, final testing. Technician Arjan Viza — Mounting, drilling, cable runs, aiming, walk-test.
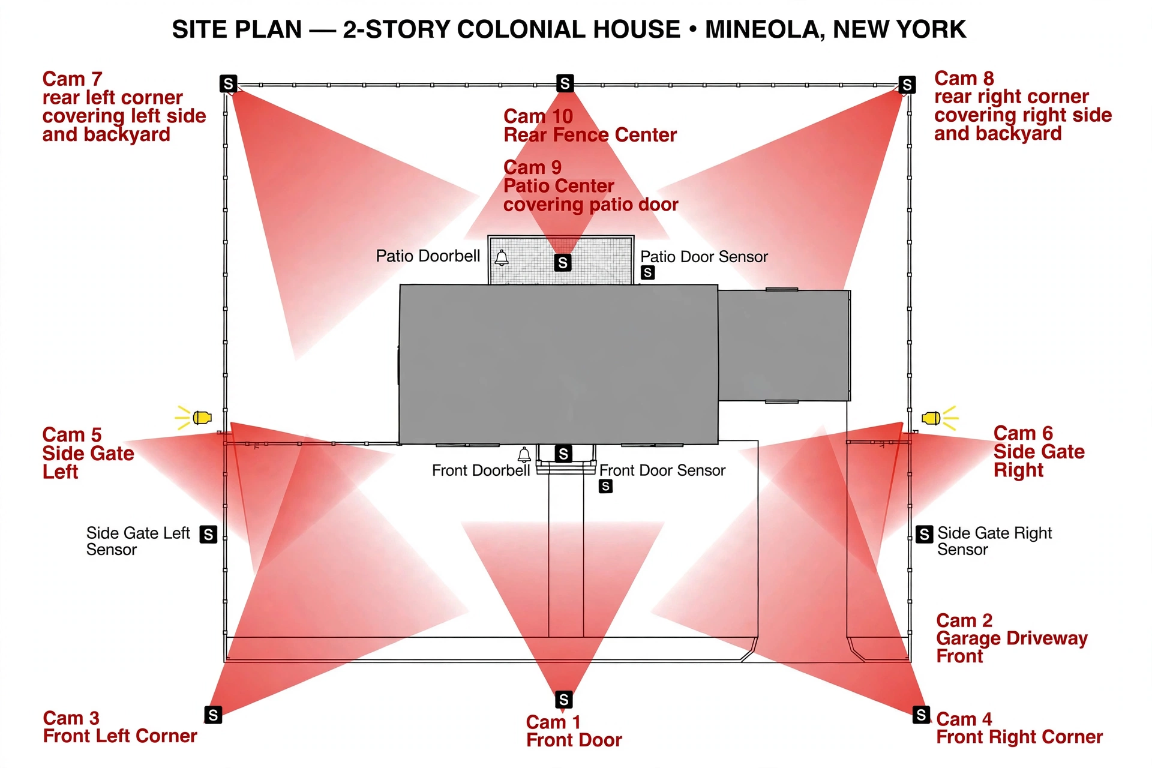
Cameras — Where Each One Was Placed
Cam 1 — Front Door: Centered above front door, looking straight out over walkway. Sees face, hands, packages. Head-on door camera.
Cam 2 — Garage Driveway Front: Above garage, centered on driveway. Sees cars entering, cars parked, garage doors. Sees plates at night because lens is tightened to driveway, not wide to street.
Cam 3 — Front Left Corner: Front left corner, looking diagonally across front yard to the right. Covers front yard and left approach. Overlaps Cam 1 and Cam 5.
Cam 4 — Front Right Corner: Front right corner, looking diagonally across front yard and driveway to the left. Covers front yard and driveway approach. Overlaps Cam 2 and Cam 6.
Cam 5 — Side Gate Left: At left gate, mounted on fence post, looking along left side. Covers left side yard and gate. Has motion light next to it.
Cam 6 — Side Gate Right: At right gate, mounted on fence post, looking along right side. Covers right side yard, gate, and garage side. Has motion light next to it.
Cam 7 — Rear Left Corner: Rear left corner, looking across backyard and left side. Covers left side and backyard.
Cam 8 — Rear Right Corner: Rear right corner, looking across backyard and right side. Covers right side and backyard.
Cam 9 — Patio Center: Centered above patio door, looking straight out over patio. The only camera that sees patio door head-on. Kills blind spot flat against back wall.
Cam 10 — Rear Fence Center: Center of rear fence, looking toward house. Covers full backyard from behind. Sees anyone before they reach patio door.
On the sketch, red cones show this overlap. Where cones overlap, shading gets darker. That darker overlap is the system. No edge is covered by one camera alone.
Door Sensors — 4 Total
Shown on sketch as black square with letter S.
- Front Door Sensor: On front door frame, strike side, top third. Magnet on door edge, switch on frame. Gap when closed: 0.5 in maximum. When door opens, gap goes over 0.5 in, circuit opens, alert fires in under 1 second.
- Patio Door Sensor: Same setup on patio door frame, strike side.
- Side Gate Left Sensor: On left gate, weatherproof housing because gate flexes.
- Side Gate Right Sensor: On right gate, same weatherproof housing.
How sensors work: they do not need a camera. Even if a camera is blocked or offline, the sensor still knows the door opened. Independent layer.
Doorbells — 2 Total
- Front Doorbell: Right of front door, at 48 in above grade, 6 in from door trim. Wired, 16-volt transformer, 18/2 cable. Press closes circuit, chime sounds, camera triggers, homeowner gets phone alert with live view and two-way talk.
- Patio Doorbell: Right of patio door, at 48 in above grade. Same spec: 16-volt, 18/2 cable, two-way talk.
How It Was Installed
- Marking, by John: Walks lot with tape and painter's tape. Marks all 10 cameras at 9 ft above grade, except Cam 7 and Cam 8 at 10 ft, Cam 10 at 6 ft on fence post. Marks doorbells at 48 in. Marks sensors on frame, strike side. Checks each mark with level.
- Mounting, by Arjan: Drills 3/16 in pilot hole, stainless lag bolts, 2 per mount, sealed with weatherproof silicone around every penetration.
- Cable runs, by Arjan: Camera cable in 3/4 in PVC conduit, weatherproof fittings, in wall cavity where possible. No cable exposed outside for more than 12 in. All cables labeled at both ends.
- Sensor alignment, by John: Gap set to 0.5 in closed with feeler gauge. Open door 1 in, gap becomes 1.5 in, must trigger. Test 5 times per door and per gate.
- Doorbell test, by John: Press test: press, chime, phone alert in under 2 seconds, live view opens, two-way talk test.
- Camera aiming and overlap test, by Arjan: Tilt set to exactly 30 degrees down with digital angle finder. Aim, lock, then walk test. Arjan walks fence line at night with phone. Must be seen by at least one camera at every step. Then daylight test: face readable at Cam 1, plate readable at Cam 2, face readable at Cam 9.
- Programming, by John: Names in plain language. Zones drawn at each gate, each door, driveway, patio. Alerts set to person and vehicle only inside zones.
Correct Math — Checked
Camera geometry: mounting height 9 ft, tilt 30 degrees down, lens 110 degrees horizontal and 60 degrees vertical. Top ray 0 degrees horizontal, bottom ray 60 degrees below horizontal. Near edge of coverage is 9 / tan 60° = 5.2 ft from wall; that gap is covered by adjacent camera overlap. Usable far edge is 45 ft; clean identification zone is 15 ft to 45 ft.
Width math: width = 2 × distance × tan 55°. At 20 ft that is 57.1 ft wide; at 30 ft it is 85.7 ft wide.
Overlap math: two corner cameras 40 ft apart on the same side overlap by 17.1 ft at 20 ft out and 45.7 ft at 30 ft out. At any distance beyond 15 ft, cones overlap by at least 17 ft — no gap.
Cable math: 10 camera runs average 48.6 ft = 486 ft, 4 sensors × 24 ft = 96 ft, 2 doorbells × 20 ft = 40 ft. Subtotal 622 ft + 20% slack = 746.4 ft; order 750 ft total.
Specifications — How Each Spec Works
- 4K Resolution: four times detail of HD. Zoom into a face or plate after the fact and still read it.
- Wired Power + Data In One Cable: no batteries, no WiFi dropouts.
- Infrared Night Vision: gates and backyard visible in full darkness.
- Person And Vehicle Detection: alerts only for person or vehicle, ignores trees, shadows, cats, rain.
- Magnetic Contact Sensor: works even if the camera is offline.
- Wired Doorbell With Two-Way Talk: press triggers live view, talk without opening.
- Motion Light At Gates: deterrent plus clearer night video.
- Central Recorder With Battery Backup: keeps recording during a flicker.
Result — Total Security, Checked
Front: camera + sensor + doorbell on front door, camera on garage, cameras on both front corners. Sides: camera + sensor on each gate. Back: camera + sensor + doorbell on patio door, cameras on both rear corners and rear fence, all overlapping. If a camera fails, the sensor still alerts. If the sensor fails, the camera still sees. If both fail, the doorbell still announces visitors at the doors.
Pricing is determined after an on-site inspection.
Project Team
By John J. — Lead Technician, Revolvis Security Services. John J. designed this Mineola layout, set the camera geometry, programmed zones and alerts, and ran final testing. View John J. on LinkedIn.
With Arjan Viza — Technician. Arjan Viza handled mounting, drilling, cable runs, aiming, and the night walk-test. View Arjan Viza on LinkedIn.
Common Questions
What did the Mineola client want? Total security — every entry covered three ways: seen by camera, sensed by sensor, announced by doorbell.
How many cameras were installed in Mineola? 10 cameras: front door, garage driveway, 2 front corners, 2 side gates, 2 rear corners, patio center, rear fence center.
How many door sensors and doorbells? 4 door sensors — front door, patio door, left gate, right gate. 2 doorbells — front door and patio door.
Why is Cam 9 Patio Center so important? It is the only camera that sees the patio door head-on. Corner cameras only see a side angle. Cam 9 kills the blind spot flat against the back wall.
Why is Cam 2 not at the front right corner? Cam 2 is at the garage driveway front, centered on the driveway for plates. Cam 4 is the front right corner camera. They are two different cameras with two different jobs.
How much does a Mineola-style system cost? Pricing is determined after an on-site inspection. No fixed price on this page.
Who installed it? Lead Technician John J. and Technician Arjan Viza from Revolvis Security Services.